
An Example of Rendering a Table In Backbone.JS
This is a beginner's guide to making a table in Backbone.js. In this example it will be a table of books with data for the title and author.
In our solution we'll define a model class to hold data about individual books and a collection class to be a grouping of all the book models. Then we'll attach a view class to the collection and gather up the html it renders by creating a view for each book model and calling render on that.
Here are the files we'll be making:
- bookModel.js - to define a model class to hold the data for each book
- bookView.js - to define a view that is attached to each book model.
- libraryView.js -to define a view that is attached to our collection.
- index.html - to be rendered by the browser. This is also where we'll create our collection and pass it to the library view.
This is how things will connect together:
")
bookModel.js
Here's what we'll put in bookModel.js:
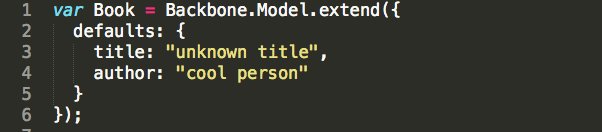
We'll use this Book constructor we just made to instantiate a new model for each book we want in our table. The extend method adds our defaults property to the normal Backbone model constructor.
The defaults are just there in case we instantiate a book model without giving it specific title and author information.
libraryView.js
Now let's make our libararyView.js file. It'll be attached to our collection (which we'll make later) and be responsible for rendering the table.
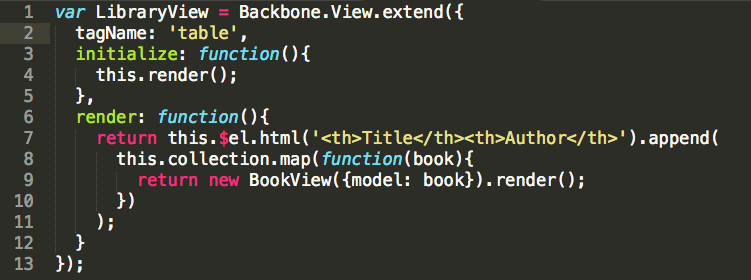
We make this view class by extending the general Backbone View class with three properties: tagname, initialize, and render.
tagname tells Backbone that we want this view to all be gathered under a table tag. If we didn't specify a tagname, it would be set to div by default.
initialize is a function where you put everything that you want to run immediately. When a new LibraryView object gets instantiated, it will immediately call its initialize function. Here we've set up the initialize function to call our render function.
render is the function we'll use to generate the html the represents our table. So whatever this function returns we want to attach to the DOM.
$el is something Backbone provides us. It represents a jQuery selection of our table tag. So we will use jQuery's .html() method to add some table headers. this.collection is a reference lets us access all the models in our collection, so we'll map over each of them and call their render function to get the html for their individual rows.
bookView.js
Let's write that bookView.js file now:
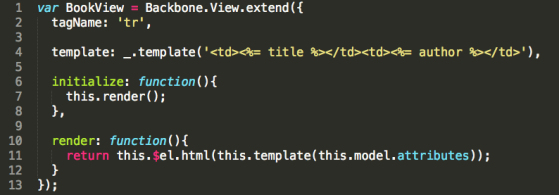
This looks a lot like our last view file. It has a tagname that specifies that this view will be a table. We also have initialize and render functions.But now in the render function fills in the <tr> tag's html by calling our template function with our model's attributes (meaning data) as a parameter.
Templating functions are weird, but you don't have to fully understand them to use them. You can use libraries like Handlebars.js to do fancy templating, but I'm going to just use the template function of Underscore.js.
The main idea with this function is you give it an html string and wherever you want to substitute in data from your model, you put the keyname of that data in between <%= and %>;.
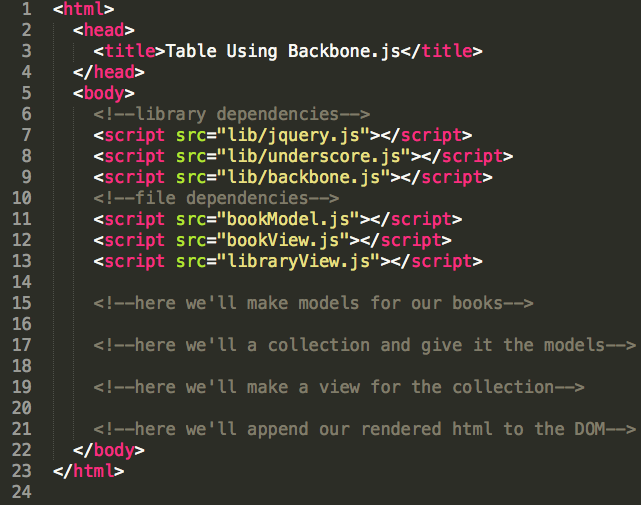
Index.html
So now we have our model and views set up. Let's write an index file. I'll write comments for the 4 pieces of code we still have to write.
The first thing we need to do now is write code that will make a few book models using our constructor from bookModel.js.
var book1 = new Book({
  title: "A Room of One's Own",
  author: "Woolf"
});
var book2 = new Book({
  title: "War and Peace",
  author: "Tolstoy"
});
Next we'll instantiate a collection using our constructor from libraryView.js and give it the models we just created. our second parameter specifies what model is connected to the things I passed in.
var myCollection = new Backbone.Collection([book1, book2], {model: Book});
Third, we'll write code that instantiates a view using our constructor in libraryView.js and pass it the collection we just made.
var myLibraryView = new LibraryView({collection: myCollection});
The last thing to write is a jQuery script that calls the render function on our myLibraryView object and attaches that html to the DOM.
$('body').append(myLibraryView.render());
Putting It All Together
Here's what our index file looks like when we add in each of those snippets using a script tag.

And we're done! Here's a screenshot of the table this makes:
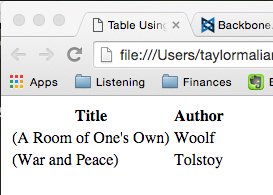
Congratulations on making it to the end! There's still more to learn if you want to make a full-fledged Backbone.js app, of course, but hopefully this blog post has helped you understand how to use models, collections, and views in a simple way.
Let me know in the comments if you liked this post or have any questions/tips. Thanks!